
When OBD access is locked, not offered for your ECU, or you simply need a complete backup, the next step with AutoTuner is the bench method: the ECU comes out of the car, stays closed, and the tool talks to it through its own connector. This guide walks through how to bench read an ECU with AutoTuner: what is in the box, how power is supplied, how the universal cable is wired, the read itself, where the backup lands, and what to check before writing anything back. Every tool fact comes from AutoTuner’s own public help centre and product pages, linked at the end.
Facts checked on 31 October 2026 on help.autotuner.com, autotuner.com and us.autotuner.com. Supported ECUs, connection diagrams and menus change with AutoTuner updates, so the instructions shown in the AutoTuner software for your exact ECU always take priority over this page.
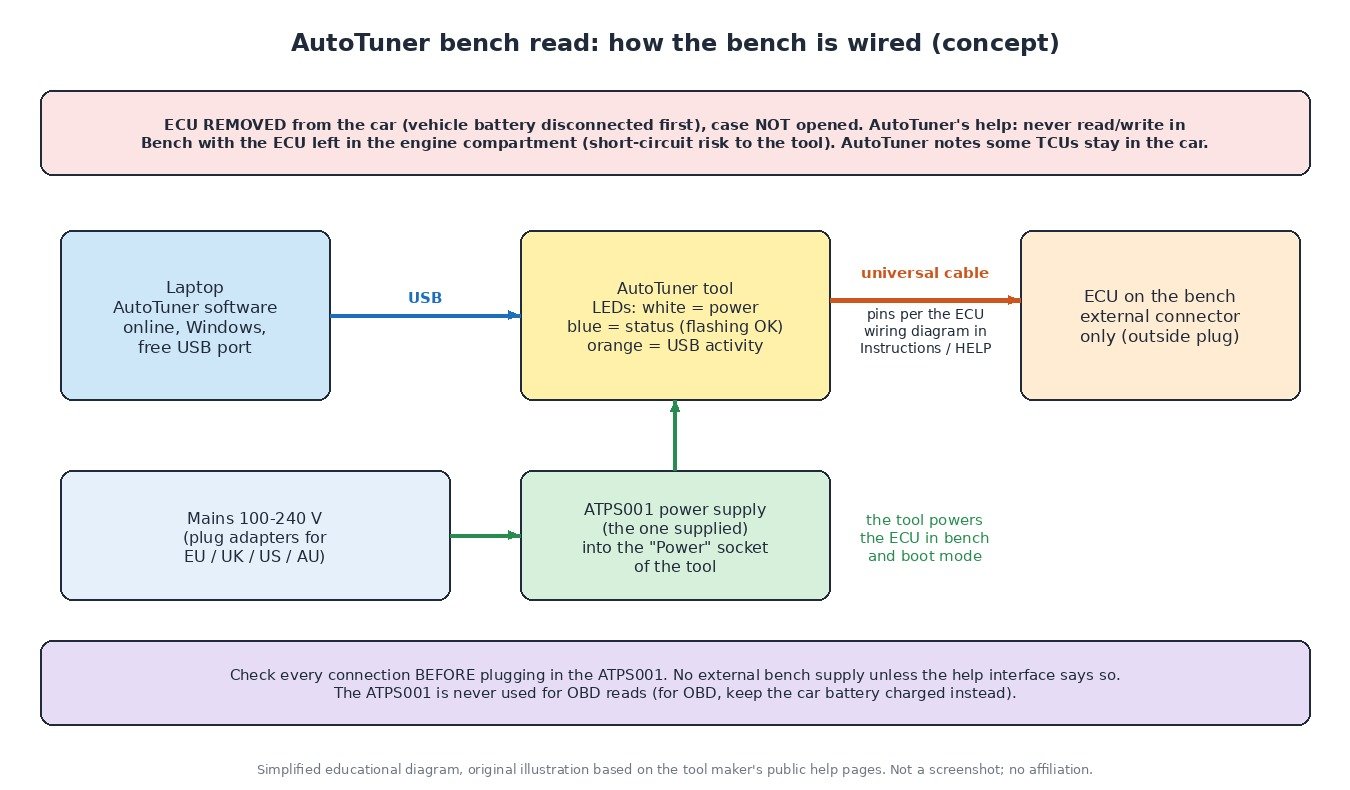
Bench, OBD or boot: when bench is the right choice
AutoTuner describes three main methods (source, source):
- OBD: connect to the car’s diagnostic socket, ignition on, read and write. Easiest, but not every ECU allows it, and an OBD read does not save a backup file (source). Our AutoTuner OBD read and write guide covers that route.
- Bench: remove the ECU but do not open it; the connection is made on the ECU’s outside plug (source). AutoTuner calls it “deeper access”, with the ability to back up many controllers and get past secure gateway locks (source).
- Boot: remove and open the ECU and connect directly to points on the circuit board (source). That is for units without a bench protocol and is outside the scope of this page.
The method list for each vehicle is in AutoTuner’s compatibility list on the flash-method pages and in the software’s vehicle selection, where the last step after brand, model and engine is the reading method (source, source). Some units also show “Bench after Mail-in Unlock”: AutoTuner unlocks the ECU at its headquarters and ships it back, after which bench reading and writing work (source). We do not publish our own list of bench-supported ECUs, because it changes with every update.
What you need for a bench read
- The AutoTuner tool and its own cables. The box contains the universal cable with universal box and a second universal cable for EDC16 and ME(D)9 ECUs, plus the USB cable, OBD cable, the power supply and boot accessories (source). AutoTuner asks you to use only the cables and accessories it provides (source).
- The ATPS001 power supply. In bench and boot mode the tool supplies power to the controller (source). Use only the supplied ATPS001; it plugs into the tool’s “Power” connector and is 100-240 V compatible. AutoTuner never requires external power unless the help interface explicitly says so, and the ATPS001 is never used for OBD reads (source).
- A Windows laptop with internet. AutoTuner lists a Windows 11 PC, a free USB 2.0 port and a fast connection; virtual machines are not supported (source).
- A clean, dry bench. AutoTuner’s safety notes: no liquids, clean connectors that are fully engaged, never force a plug into a connector (source).
Step by step: bench reading an ECU with AutoTuner
- Disconnect the car battery, then remove the ECU. AutoTuner says disconnecting the battery before removing the ECU for a bench or boot read is imperative (source). Do not open the case (source).
- Keep the ECU out of the engine bay. AutoTuner’s help centre states it is strictly forbidden to read or write in bench mode with the ECU left in the engine compartment, because it can cause a short circuit and destroy the tool (source). AutoTuner’s US flash-method page notes that some TCUs stay in the vehicle (source); that only applies where the instructions for that unit say so.
- Select the vehicle and the Bench method. Click “Select a vehicle” and go brand, model, engine, then method; advanced users can use the search field at the top right to pick an ECU directly (source).
- Open the Instructions. The Instructions button opens the help interface with step-by-step instructions and the ECU location. If the HELP button is blinking, there are extra instructions you must read (source). AutoTuner shows high-resolution connector images that you can rotate to match how the ECU sits on your bench (source).
- Wire the universal cable to the ECU connector exactly as the wiring diagram for that ECU shows; the other end goes into the tool’s “BOOT” connector (source). On the universal cable, PWD1 is the dark blue wire and PWD2 the brown wire (source).
- Check every connection, then power up. AutoTuner asks you to check all connections before connecting the power supply to the tool (source). The white LED means the tool is receiving +12 V; when it flashes, at least one +12 V output is on, so make sure no loose wire can short against metal. The blue status LED flashes when the interface works properly; if it does not, unplug and restart the tool (source).
- Identify. The tool checks communication and displays the ECU references (source). Write down hardware and software numbers; if they do not match what you selected, stop and re-check the selection and wiring.
- Read. Choose the read type the software offers for that ECU (for example without password, normal read, or only password) (source). Keep the bench undisturbed until the read finishes.
- Save the files. On a bench or boot read, AutoTuner automatically saves a backup file with all memories of the microcontroller in %userprofile%\documents\Autotuner ECU backups\ (.zip for Master tools, .bak for Slave tools) (source). Copy the read and the backup to a second place, such as a USB drive or cloud folder, labelled with the car and the date. Our AutoTuner backup file guide explains its contents.

Writing the tuned file back on the bench
- Re-read first. AutoTuner stresses reading the ECU again before writing a tuned file: the car may have had a manufacturer software update since your last read, and writing an obsolete file can leave the car unable to start (source).
- Write. Use Write > “Tuned file or backup” to select your file, or “Original from server” to put back the original that matches the connected ECU (source).
- Back to stock. The backup file can be written straight to the ECU to return it to its original state; a Slave user can do that without the Master’s help (source). If anything in a file from the backup has been edited, its checksum must be corrected before writing (source).
- Refit and check. Re-fit the ECU, reconnect the battery, start the engine and read fault codes in all modules.
Common problems and fixes
- No communication on Identify. Re-check the selected ECU against the label, then every pin against the diagram, PWD1/PWD2 included (source). Make sure the power supply is the ATPS001 and plugged into “Power” (source).
- Blue status LED not flashing. Unplug and restart the interface (source).
- The help says extra steps. A blinking HELP button means additional instructions apply to that operation (source).
- Still stuck. Use “Export logs”: it saves the tool’s operating history and a screenshot as a .zip, which AutoTuner asks you to attach to every support request (source, source).
Master or Slave: what you can do with the read
A Master tool gives unencrypted files you can edit yourself or send to any tuning file provider; a Slave tool reads and writes encrypted files that only its linked Master can modify (source). AutoTuner notes that most of its customers edit with EVC WinOLS (source).
Send your bench read to ECU File Market
With a Master tool, upload your original read together with the vehicle, engine, ECU hardware and software numbers (from Identify), the tool you used and the stage you want; keep the backup file safe in case it is needed. Credit prices are public on our pricing page, and most files come back in under one hour during support hours. Checksum correction, where needed, is a paid extra. Then re-read and write the file back as described above.
Good practice: only work on vehicles you own or are authorised to work on, keep the original read and backup for the life of the car, and keep every emission control system fitted and working. This guide does not cover removing or disabling DPF, EGR, SCR/AdBlue or any other emission equipment.
Sources (checked 31 October 2026)
- AutoTuner help: Universal cable + universal box: help.autotuner.com/en/articles/2984815-universal-cable-universal-box
- AutoTuner help: Power adapter (ATPS001): help.autotuner.com/en/articles/2984844-power-adapter
- AutoTuner help: Meaning of the buttons: help.autotuner.com/en/articles/2984754-meaning-of-the-buttons ; Meaning of the LEDs: help.autotuner.com/en/articles/2984805-meaning-of-the-leds ; Vehicles selection: help.autotuner.com/en/articles/2984809-vehicles-selection
- AutoTuner help: Backup file: help.autotuner.com/en/articles/2984015-backup-file ; Why you should always read the ECU before writing: help.autotuner.com/en/articles/4027883-why-should-you-always-read-the-ecu-before-writing-the-tuned-file
- AutoTuner help: Master tool vs Slave tool: help.autotuner.com/en/articles/2984985-what-s-the-difference-between-master-tool-and-slave-tool ; Export error logs: help.autotuner.com/en/articles/2984939-how-to-export-error-logs-file ; Safety precautions: help.autotuner.com/en/articles/2984792-use-precautions
- AutoTuner flash methods: autotuner.com/pages/flash-method/bench ; autotuner.com/pages/flash-method/boot ; us.autotuner.com/pages/flash-method/bench
- AutoTuner Tool product page (box contents, methods, requirements): us.autotuner.com/products/tool
AutoTuner is a trademark of its owner; EVC WinOLS is a trademark of EVC electronic GmbH. ECU File Market is an independent tuning file service and is not affiliated with, endorsed by or sponsored by AutoTuner or EVC. Names are used only to describe compatibility and workflow. Use only genuine, licensed tools and software.